Skype for Business Web Scheduler is a web-based program that you can use to create Skype Meetings if you don’t have Outlook, or don't have a browser that supports Outlook Web App. With Skype for Business Web Scheduler, you can create new meetings, change your existing meetings, and send invitations with your favorite email program.
The web address for Skype for Business Web Scheduler depends on your organization. If you don't know your Web Scheduler address, or aren't sure, follow these steps:
- Go to the Office 365 Web Scheduler address at https://sched.lync.com and try signing in with your work or school account.
- If that doesn't work, contact your workplace technical support for the Skype for Business Web Scheduler address in your organization.
Create a Skype Meeting
When you sign in to the Skype for Business Web Scheduler, you'll go straight to the New Meeting page.
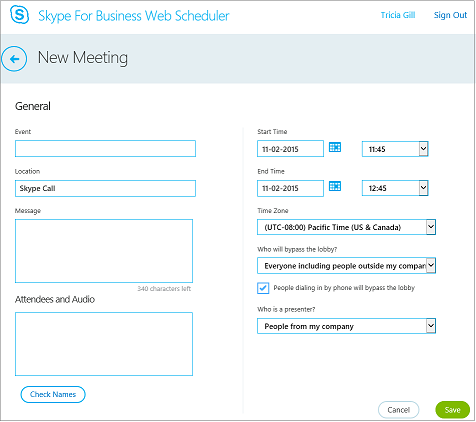
- Enter an Event title for your meeting.
- You can leave the meeting location as Skype Call, or add a location, such as a conference room, if you have in-person attendees as well.
- Enter meeting details in the Message box, and set the start and end date and time.
- Under Attendees and Audio, add the attendees’ names or email addresses, separated by semicolons (;).
- (Optional) Select Check Names to verify the addresses of the participants who are in your organization.
- Under Who will bypass the lobby? and Who is a presenter?, do one of the following:
- Accept the standard settings, which are best for small working meetings with people inside your organization.OR
- Choose other lobby or presenter options depending on the type of meeting you want to schedule.
Who's a presenter?Who gets in directly? What happens? Recommended when… Organizer only You are the only one who gets into the meeting directly. Everyone else has to wait until admitted. You have a high security meeting and confidential information. People I invite from my company Only people who were invited can join the meeting directly. Everyone else has to wait until admitted. You’re discussing confidential information, and want to only allow specific people to join. People from my company Anyone from your company can get in to the meeting directly, even if not invited. You don’t have external participants and you are not discussing confidential information. Everyone (no restrictions) Anyone who has access to the meeting link gets in to the meeting directly. You’re inviting outside participants and you’re not discussing confidential information. Presenter option Who is a presenter? When to choose this option Organizer only Only the person who schedules the meetings For presentations where the participants don’t have to interact with the meeting content. (You can designate additional presenters during the meeting.) People I choose You and the participants you choose For presentations with more than one presenter People from my company Everyone you invite who has an account on your network For group work sessions, where all participants work at your organization and can share and modify meeting content Everyone (no restrictions) Everyone you invite For group work sessions with people who don’t have an account on your network - Check the box next to People dialing in by phone will bypass the lobby if you want your dial-in callers to go straight to the meeting.
- Select Save.
Send the meeting information to participants
To send the meeting request, you can copy the meeting details and paste them into an email program, or save the details in iCalendar format send it as an attachment.
Copy the meeting request and paste it into an email
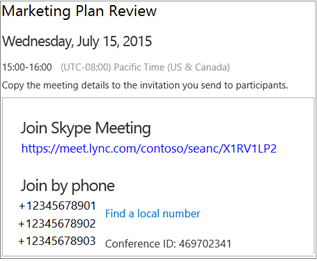
- When you’ve finished creating the meeting, select Save. You'll see a confirmation page that lists your meeting details. Click the X to close the confirmation page.
- On your My Meetings page, highlight the meeting information, right-click, and then choose Copy.
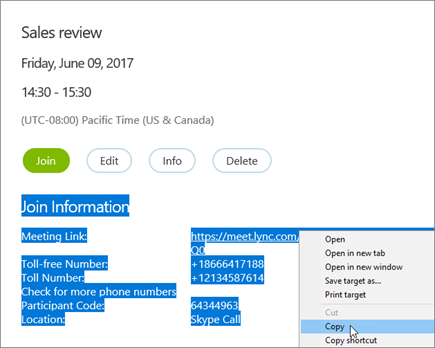
- Open your email program and create a regular meeting request.
- Paste the meeting information into the request.
- Add the participants' email addresses to the message, add the meeting date and time, enter a meeting agenda, and then send the request.
Send your meeting request as an iCalendar file
The iCalendar file format lets users of different email systems exchange calendar information. To send your meeting request as an iCalendar:
- In the My Meetings section, select the meeting by its subject, and then select Info.
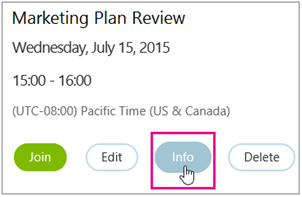
- At the bottom of the meeting invitation window, select Export as iCalendar.

- When prompted by your web browser to either open or save the iCalendar file, select Save.
- Create an email message and add the iCalendar file you just created as an attachment. Tip: Learn how to insert an attachment in Outlook or Outlook Web App.
- Enter the meeting participants, meeting title, and a message as appropriate, and then send the email.
When participants open the iCalendar file, the meeting is automatically added to their default mail or calendaring program.
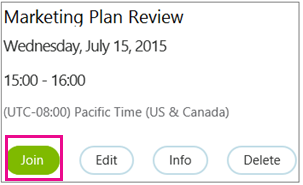
Join a Skype Meeting
To join a meeting you created with Skype for Business Web Scheduler, do one of the following:
- Open the email meeting request and select the meeting link.OR
- Open Skype for Business Web Scheduler, select the meeting you want from the list on the left, and then select Join in the meeting summary pane.
Learn more:
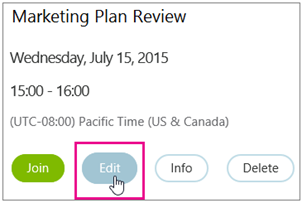
View, edit, or delete an existing meeting
To view a meeting's details, open Skype for Business Web Scheduler and select the meeting title on the left. Skype for Business Web Scheduler lists only the meetings you've scheduled, not all the meetings on your calendar.
To edit or delete a meeting:
- Select Edit or Delete in the meeting summary pane.
- After you've made your changes, send the participants either the updated meeting information or a notice of the meeting cancellation. Important: Skype for Business Web Scheduler doesn’t update your calendar automatically, so participants must be informed of every change you make.
Fontes: https://support.office.com/en-us/article/Skype-for-Business-Web-Scheduler-3b24a211-6470-4a2d-81b7-22d9399d0fec